How Guttering is Installed
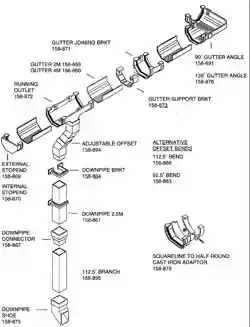 Before you start
If you are just replacing old gutters, plan to install the new downpipe to the original drain. For new extensions or conservatories, position new gutter outlets so that the downpipes run to an existing gully or drain. If this can't be achieved, install a new gully to the main drainage system or a soakaway may be built and the new connections can run to this.
BUIlDING REGUlATIONS. For new builds and any gutters that connect to the main drainage system, your local council autority must be contacted before you start. For new builds, they will advise you of their requirements for the disposal of surface water when they approve your plans.
SAFETY. Never allow gutter pipes to drain over a driveway or path as this will lead to the growth of slippery algae and also the formation of ice during winter months.
_________________________________________________________________
 ♦ Fit a gutter bracket near to the top of the fascia board at one end of the run of guttering. Tie a piece of string around the bottom of the bracket.
 ♦ Hold a plumb line against the fascia board directly over the drain on the ground. Mark the position on the fascia with a pencil. Fit the gutter outlet no more than 50mm below the level of the roof tiles, make sure to fit it sucutely using the correct amount of screws.
 ♦ Stretch some string or a builder's line from the bracket all the way along to the outlet and tie it. Using a spirit level, check that there is a slope towards the outlet: a slight fall of 10mm every 6m of gutter, will encourage water to drain effectively.
 ♦ Mark the position of the other brackets, spacing them no more than 1m apart and no more than 150mm from any joint or fitting. If the outlet is in the middle of the gutter, repeat the process with a bracket at the other end of the guttering run so that it too slopes towards the outlet.
 ♦ Fit the rest of the brackets.
 ♦ Fit a stop-end to the first length of gutter and clip the gutter into position on the brackets. The easiest way to do this is to tilt the gutter to fit under the back clip and then straighten it under the front clip. Line up the gutter end with the insertion depth mark on the bracket.
 ♦ Fit a union piece at the other end of the first length and screw it into the fascia, then fit the next length of gutter into it. Continue joining lengths. Cut the last section to fit using a hacksaw and fit a stop-end. Make sure all joints line up with the insertion depth marks on the fittings.
